Dollhouse Blogs

Sunday 30 December 2012

Happy Holidays, Renovations and a Dewell Roombox

Hello Everyone!
First of all, I am so sorry not to have written this post earlier. I want to wish you all the Happiest holidays ever and I wish you all the best for the New Year! I can't thank you all enough for your incredible kindness to me. It has been a real privilege to get to know all of you and to be inspired by your work, ideas, and the wonderful people you are.

I feel very guilty not having commented on your blogs very much in December. But Real life decided to test how hard headed I could be.

Renovations:
Dewell Manor has not changed the past month. At the end of November I made the painful decision to put the Manor on hold and concentrate on renovations. My father in law started working on reconfiguring the 2 bedrooms of out house in September. Unfortunately Jo's 94 year old grandmother fell and broke her hip. she is recovering very well, but renovations got put on hold. To make a long story short, by the time December came by I be came determined that everything be done in time for Christmas Eve when I always have both sides of the family over for supper. We all jumped in and put in crazy hours on the weekend all month. The last week  before Christmas I woke up at 5:30 as usual, went to work, then got home and worked until 1 or 2 in the morning. My house was a mess as both bedrooms had to be emptied and everyone kept telling me we would never get it all done in time, but they underestimated my determination.

This was our dining room in December. We had the bedroom floors refinished on the 11th, so we squeezed in our queen size mattress and slept here until December 23...not fun.

We finished renovation work December 24th at 3:15 am. I woke up at 7:30, put the turkey in the oven, and put up the 2 Christmas trees, decorated the house, and set the table. By 1 pm my Dining room was back in order and the meal was served at 8 pm...late, but what can you do

It was hard work, I have been exhausted for 2 weeks now, but the bedrooms came out just the way we wanted. we only have 2 closet doors and closet shelves to put up left

Second bedroom, and hopefully the nursery one day

The old owner had closed up the closet in this room to make an inefficient walk in in the Master bedroom


Master bedroom. The new wall of closets we added gave us more storage then we thought. Originally the only place a queen size bed fir was in between the 2 windows so the bed was right in the middle of the room where the dresser with the mirror is.


Master bedroom. The left side of the nook used to have a ridiculous walk in closet. It had to go. When we bought the house they had turned 2 rooms into 1 big master bedroom. The had put a simple wood plank to cover where the wall used to be on the floor, so we tried to make it look better and came up with the design you see.

 We were glad it got done because we were going crazy, but we were most concerned about Ozzy who seemed totally lost the whole time. Luckily he's back to himself again

And this is why, my dear friends, I have not been as present on your blogs. Once again I apologise but will catch up on your blogs as soon as I've caught up on some sleep.

Christmas Presents:

Once again Jo and both sides of the family got together and I was spoiled rotten.


Jo has a list of the Getzan chandeliers I want for each room. I got the 2 Versailles chandeliers for the Music room and the Princess Pat (on the left) for the Dining Room. The breakfront also goes int he Music room. The living room set is a present I ordered myself and will go in the Morning room in the attic. I had a set for the room, but it felt a little too modern. Unfortunately they sent me the walnut set instead of the Mahogany, so it will have to go back this week so they can send me the right one. Jo also got me the 2 first seasons of another one of my favourite shows, a British series called "Waiting for God". I was a very happy Giac indeed.

Room box:
Another reason I have not worked on the Manor is because I started a room box the last 2 weeks of November. I have a wonderful friend who has always been very encouraging and helpful with my project. I wanted him to have a small piece of Dewell Manor so I decided to make him a room box inspired by the Great room of the Manor. I had to stop work on it, but It is almost finished.
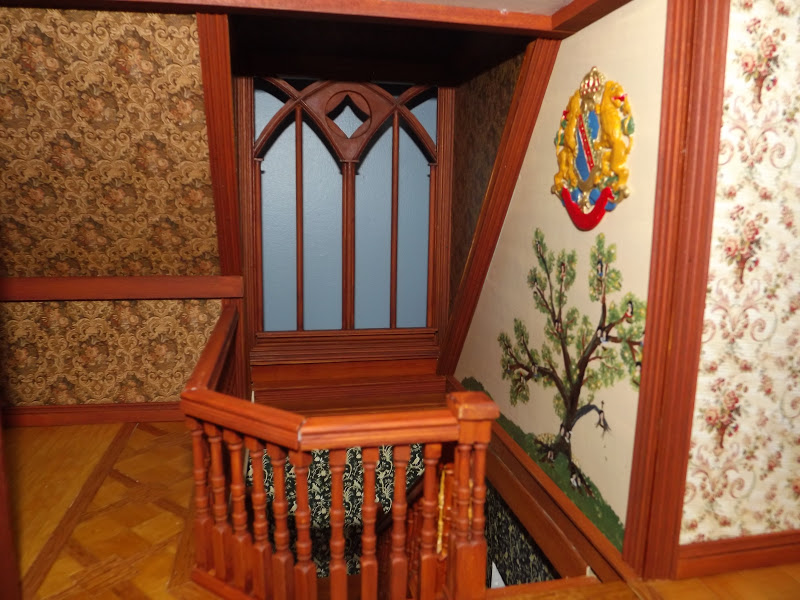
Here is a look at the almost complete room box. the fireplaces are very similar to the Great room, the wallpaper is from the Master Bedroom, the floor is the pattern I used in the Gothic Hall and since I wanted it to be a bit more modern I made a side table inspired by the Chinese Tea Room

I used lumber from our hardware store and double thick illustration board. The left section has built in shelves and the right section has a window.

When the sections were assembled I painted the base coat for the faux-walnut finish which Ray showed us how to do. Once that was dry I painted the marble fireplace using black base with 2 shades of green sponged on. The firebox is illustration board and magic brick.

When the marble was dry I taped it with masking tape and faux finished the wood

The fireplaces of the Great Room have figures I made to represent the 3 Graces. For this room box I made 2 Greek figures in super sculpey, baked them, and then painted them to match the faux-walnut

When the figures were glued into place I took out my molding pieces and built a smaller version of the Mantels in the Manor.

When all the sections were done I assembled the structure and glued on the wallpaper with regular wallpaper paste (works great on Les Chinoiseries wallpapers, not so great on other thinner dollhouse papers) I still need to glue in the ceiling paper

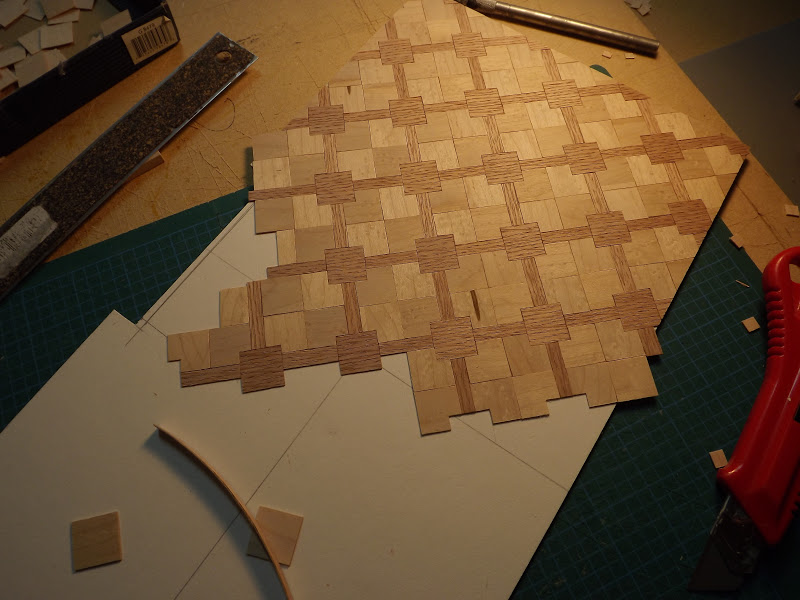
When the floor was done (again, I used iron on wood strips I cut out of rolls from the hardware store) I built a table to go against the side wall. The marble parts are basswood with molding I painted, and the chinoiserie part is a block of left over lumber from the renovations and the drawer fronts (non opening) are just 1/16 x 1/2 inch lumber which I painted with delta ceramcoat paints. The swans were dollar store finds I've had for years.

And then, I stopped for the renovations. I still have to to add the ceiling paper, curtains, a large painting over the table and some accessories, then it will be ready to send.

And that is all my friends. At first I was rather pleased I got everything done, but if truth be told it took it's toll on me. I go back to work on Wednesday, and hope to be working on the Manor by next weekend.

For anyone looking for a something to read, I bought a really great book about the Thorne Rooms on Amazon.

The book was rather inexpensive. It has wonderful pictures of the Thorne Rooms and a lot of interesting reading for each room. I am really happy I added it to my collection.

On that note, I promise I will be back commenting on your blogs very soon. I've been dying to see what you've all been up to.
I wish you all the very, very best my dear friends: health, happiness and prosperity. May the kid inside each of you be strong, and may you always smile with your hearts

Big, big hugs,
Giac


Sunday 18 November 2012

The Gothic Hall and the Attic Parlour

Hello Everyone,
I hope you are all doing well! Thank you once again for your kind feedback. It means a great deal to me to have other miniaturists enjoy my work. The past few weeks have been busy with the never ending renovations and work has been crazy, but I found time to finish the Gothic Hall and Parlour in the attic.

Gothic Hall


The Parlour 
The fireplace I made was originally all mahogany, but I wanted something a bit more elegant, so I used some marble paper I purchased years ago.


The Gothic Hall is the room between the Nursery and the Bathroom with the attic staircase landing. I had a hard time deciding what this room would be . Originally I thought about a small sitting room, then office, and finally, mostly because of the design, I decided it would serve as a prayer room. I'm not getting into any religious discussion, but I will say that the Dewells share my beliefs: The table will have the religious book of each main religion living side by side peacefully. 
I love Gothic churches and decided to divide the staircase area and the prayer room with Gothic arches. I started by taking a piece of 3 inch basswood and cutting out the arch shapes I wanted with an x-acto knife. I didn't like the space above the side arches, so I cut out openings to add some architectural detail. The second step was adding molding to the arched openings. Again, I scored the molding every 1/8 inch, about half way down, and was able to curve it.

In the next picture, you can see the supports I used to hold a 1/2 inch strip to make the arch piece look wider. I took some cocktail toothpicks, cut them and glued them into the top opening to add a little interest. I didn't put a back to the piece because there is no way to see it.
 When the glue was dry, I added some molding to the front of the piece. Usually I cover the curved molding with Gesso to fill the cuts I made for curving but I liked the detail it added so I just painted the piece as is.
 Next, I had to make the columns to support the arches. I used a 5/8 inch dowel to make the columns and attached the railing pieces to them.
 The next picture is the dry run before I designed the rest of the room. This is when it became clear the room would have a very religious character.
After the arches I took out my books and looked at churches to come up with a design for the window over the staircase. I was going to make a skylight, but decided to make a large dormer instead.
 To build the window I made a frame with 5/8 strip molding and I took a 3 inch wide piece of basswood and carved out the arch details at the top. I used molding to accent the curves and I used the smallest dowels I could find to make the column detail. I just glued them together lengthwise.
 Here is the window in place. All the windows in the manor will get panes of stained glass, but this window will be all stained glass. I have not put a roof on the dormer yet. I'm still deciding if I want to make it skylight so I can have daylight coming in over the staircase. 
 And here is a close up of the arches and window after faux-finishing.
The wall over the staircase was quite large and I wanted to make something interesting with it. I decided to paint the Dewell family tree. You have all heard me say how much I hate painting, but i think I did a pretty good job of it

 I started by looking at pictures and painting the tree. When the tree was dry I tried...tried...to paint faces. In the closeup picture you can see some of them look like Wallace and Gromit, but considering I don't like painting, don't to it much, and the tree is only 4 1/2 inched tall, I am quite pleased with it.
The Dewell who live in the Manor are on the top left branch
 The family crest was a present for one of my best friends.When I made the Chinoiserie panels I was asked how I painted the designs. Honestly I have no technique. I look up what I want to paint on line and in books and I try to interpret it.  I use Delta Ceramcoat paints and the smallest brushes I could find.
View before the arches were installed
 When you are standing on the side of the house you can look through the door frame of the Morning Room and you get a good view of the tree and the banisters.
Morning Room and hall view


The Parlour was also a bit of a challenge. I cut out the back of the roof to make room for large windows. You would have views of the ocean from both sides and I wanted to take advantage of that. I built the windows and a fireplace and had a test fit,
 The only sad thing is that the only way to see this room is through the doorway of the Chinese Tea Room. You can see the back windows and the fireplace and that's it! The side window cannot be seen at all
Here is a look at the elements for both room when I was ready to paint them,

 Instead of making a deep dormer I added a balcony being the back windows. The manor will be brick and stone. I am using the Magic Brick system. I painted the balcony wall the colour I want the grout, then I applied the tape that came with the Brick kit.
 I added water to the powder until it was icing consistency, then applied it over the surface, waited 5 minutes, and removed the tape. Here it is dry and varnished. I love the look, but will age and colour the bricks when I do the front of the manor.
This balcony wall was also a colour test. I used the beige I painted the kitchen ceiling for grout colour and also for the stonework. I think it will look better when I'll individually paint certain bricks and age the walls
Next, I made the floors for the rooms and the 2 corridors. For the Gothic Hall I made a pattern using 2 types of wood and I played with the grain direction....it took forever!
Gothic Hall Floor
Parlour
 Since the Parlour would barely be seen, I wanted to make a bold floor that would stick out.
 I used 3 types of wood, played with the grain direction again...really played...then I added 2 coats of shellac. Here is the finished floors connected by the hallway floors.
Finished Floors
 The hall to the left leads to the Morning Room and Nursery, and the other hallway is behind the bathroom. The last thing to do before assembling the rooms was to put a ceiling in the parlour. In the picture below you can see I screwed in a piece of wood on which I glued the double thick illustration board ceiling.
When the ceiling was done I started gluing all the elements down. Here is a look at the Parlour through the back window...a view you'll never see again,
You can see unfinished elements from this view. This room was a lot of work and I decided it was not worth finishing walls impossible to see...although I haven't ruled out finishing the walls at a later date.
 And here is the only view of the Parlour. When the room was assembled I noticed you could see the structure through the doorway. I added a 5 inch wall on each side of the doorway creating an anteroom. It covered up the structure, but it made the view even narrower.
 And here are the pictures of the empty rooms. I wanted chandeliers in every room, but in the Gothic Hall I think I'll hang stained glass lanterns between the side arches and I'll get some floor candelabra.

Gothic Hall. The wainscot was a present from one of my closest friends, as well as the ceiling which is the same as the Chinese Tea Room, only all white.

Parlour behind Chinese Tea Room. I'm happy the floor worked with the anteroom walls.

View of the dormer through the Nursery door

Hall behind Nursery
And that is what I got done since my last post. Technically, all the interior rooms of the Manor are finished...so it's time to redecorate! I have to redo the Library Floor, and I have to say I am not happy with the Music Room. It's okay, but not what I envisioned. I will make a new floor, add wainscot,and make more caryatids. I have also been thinking of the Loggia. I know what I want, but just have to figure out how to do it...and of course, there are the shingles for the roof...
 As I mentioned earlier we are still renovating our house and work has been gruelling so I don't have as much time to work on my miniatures, but as soon as another room is finished you can expect a new post. I hope you all have a great day, week, month...and while I don't put up new posts often,  I'll definitely be following your wonderful projects.
Thank you once again my friends.
Big hugs to all,
Giac